Chocolate lovers, gather around! Today, we’re diving into a recipe that’s going to make your heart skip a beat and your taste buds dance in delight. It’s all about a Chocolate Tart that’s not just any ordinary dessert. This is a creation that combines the richness of bittersweet chocolate with the smoothness of whipped cream, all nestled in a perfectly baked pie crust. So, roll up your sleeves, and let’s get started on this journey to chocolate heaven!
The Magic Begins with the Crust
To make a great start, you need a good crust. For this recipe, you’ll need two 9-inch pie crusts. But instead of putting them in a pie dish, we’ll roll them out into a rectangle slightly larger than a half-sheet pan. Make sure the crust is even, and gently place it into a greased pan, pressing it into the corners. Trim off any excess dough and crimp the edges to make it look nice. Remember, appearance is just as important as taste!
The Heart of the Tart: The Filling
Now, let’s talk about the star of the show – the chocolate filling. We’re using 10 oz of bittersweet chocolate, which promises a deep, rich flavor. But here’s a pro tip: keep some extra chocolate on hand for topping. You’ll thank me later!
The Process:
- Melting Chocolate: This step is therapeutic. Melt the chocolate in a microwave-safe container and stir it until it’s perfectly smooth. It’s like watching your worries melt away.
- Egg-Sugar Mixture: Whisk eggs and granulated sugar in a saucepan. You’re looking for a mixture that’s just right – not too thick, not too thin.
- Combining the Magic: Once the chocolate is melted and the egg-sugar mixture is ready, combine them with vanilla extract. The aroma that fills your kitchen at this point is pure bliss.
- The Whipping Cream: Beat the heavy cream until it forms stiff peaks. This is where your arm might get a workout, but it’s totally worth it.
- Bringing it Together: Fold some of the whipped cream into the chocolate mixture. This is where the magic happens, and your filling is ready!
Assembling Chocolate Tart
With your crust cooled and your filling fluffy and ready, it’s time to assemble. Spread the chocolate mixture into the crust and let it chill. Patience is key here – the longer it sets, the better it tastes.
The Final Touch
Once your Chocolate Tart is set, top it with the remaining whipped cream. And for that extra touch of luxury, sprinkle some chocolate shavings on top. It’s not just a dessert; it’s a masterpiece.
Why This Tart is a Must-Try
- Rich and Luxurious: Every bite of this tart is a blend of rich chocolate and creamy texture.
- Perfect for Any Occasion: Whether it’s a family gathering, a romantic dinner, or just a treat for yourself, this tart fits right in.
- Customizable: Feel free to add your twist – maybe some orange zest in the filling or a sprinkle of sea salt on top.
Conclusion
This Chocolate Tart isn’t just a dessert; it’s an experience. It’s about taking simple ingredients and turning them into something extraordinary. It’s about the joy of baking and the love of chocolate. So, why wait? Try this recipe today and indulge in a slice of heaven!
Remember, the best part about baking is sharing it with others. So, share this recipe, share the tart, and most importantly, share the joy. Happy baking! 🍫🍰
Print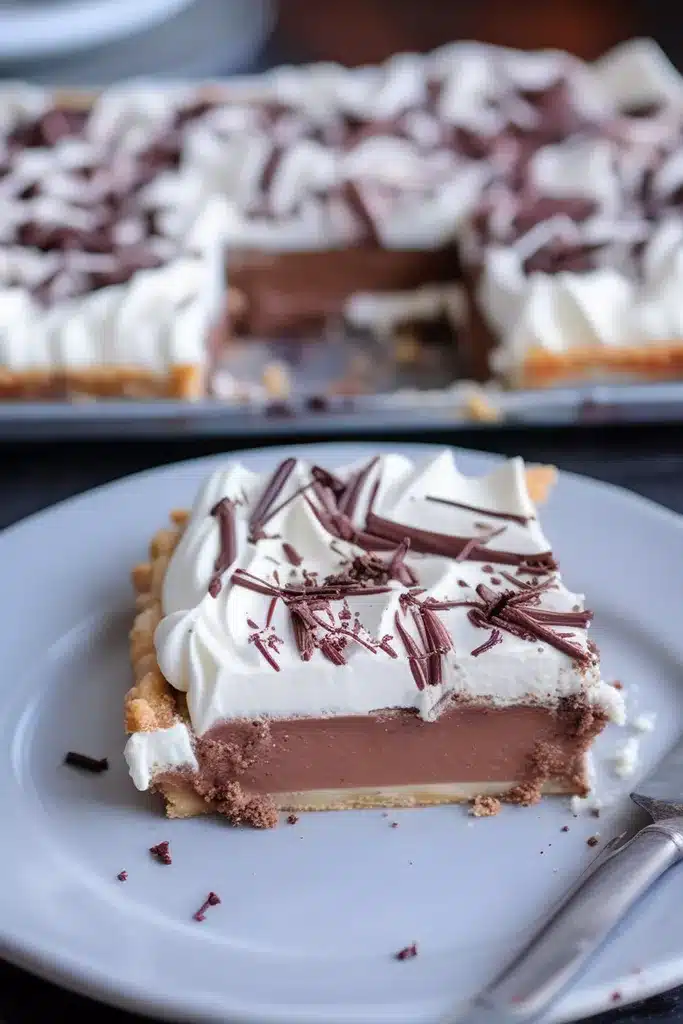
Chocolate Tart Recipe
Dive into the world of decadence with this rich and luxurious chocolate tart. Perfect for chocolate lovers, this dessert combines bittersweet chocolate with smooth whipped cream in a perfectly baked pie crust.
- Total Time: 47 minutes
Ingredients
- 2 9-inch pie crusts, softened
- 10 oz bittersweet chocolate, plus more for topping
- 4 eggs
- 1 1/3 cups granulated sugar
- 2 teaspoons vanilla extract
- 1/2 cup (1 stick) unsalted butter, softened
- 2 1/2 cups heavy whipping cream
- 1/3 cup powdered sugar
Instructions
- Preheat oven to 350°F and grease a half-sheet pan with nonstick spray. Set aside.
- On a lightly floured surface, stack pie crusts on top of each other and roll out into a rectangle slightly larger than your baking pan. Place crust in pan, pressing into the corners. Trim off excess dough and crimp edges.
- Line crust with parchment paper and fill with pie weights or dried beans. Bake until slightly golden, about 15-17 minutes. Remove from oven and let cool completely.
- In a microwave-safe container, melt the chocolate in 30-second increments, stirring in between, until nearly melted. Then, stir until completely melted. Set aside.
- In a medium saucepan, whisk together sugar and eggs. Reduce heat to low, and stirring constantly, heat until sugar has dissolved and mixture coats the back of a spoon, about 5 minutes.
- Remove from heat and stir in the melted chocolate and vanilla extract until smooth. Let cool until warm, stirring occasionally.
- In a mixing bowl, beat butter until light and fluffy, 2-3 minutes. Gradually pour in the chocolate mixture, then beat on high until light and fluffy, about 5 minutes.
- In a separate bowl, beat the heavy cream with an electric mixer until it starts to thicken. Add powdered sugar and continue beating until stiff peaks form.
- Fold 1 1/2 cups of the whipped cream into the chocolate mixture and reserve the rest for topping.
- Spread chocolate mixture into cooled pie crust and chill until set, 1-2 hours.
- Top with remaining whipped cream and garnish with chocolate shavings before serving.
Notes
- For an extra rich flavor, choose high-quality bittersweet chocolate.
- Allow the tart to chill thoroughly for the best texture.
- Garnish with fresh berries or a dusting of cocoa powder for a decorative touch.
- Prep Time: 30
- Cook Time: 17
- Category: Dessert
- Method: Baking
- Cuisine: European


1 Comment
Pingback: Old Fashioned Sour Cream Pound Cake - Cooking At Home